Sean Baartmans
Applications Support
Intel Corporation
One component of the Project Builder kit is a target board which can be used to evaluate the 8XC196KD, a 16-bit microcontroller. The target board interfaces a monitor running on a PC (with a Intel microprocessor inside) using code burned into the OTPROM of the 8XC196KD. This code is called RISM. It is possible for the user to use the target board in standalone mode. The user loads their code to an external EPROM or SRAM on the board. The user then makes one jumper setting change and upon reset their own code is executed from external memory on the target board. It is stated in the Project Builder User's Manual, that it is possible to operate the target board in standalone mode. Unfortunately, it is not clearly stated within the manual how to do this. This document clearly states the correct procedure for operating in standalone mode as well as give the user a better understanding of the board memory map.
First let's explain how the board operates in standard mode. The RISM monitor is located in memory locations 2000H to 9FFFH. When the controller comes out of reset it will initially look to location 2018H for the Chip Configuration Byte. In standard mode, 2018H is found in the internal memory. RISM code begins executing internally at 2080H. When the user initiates the go command the RISM vectors to A000H. The beginning of the user's code should be located here.
The difference between standard mode and standalone mode is whether the code from 2000H to 9FFF is located internally or externally. In order to run in standard mode we need to run code from the internal memory. In this case the EA# pin would be connected to Vcc by leaving jumper E1 on the board unconnected. The memory map for EA# connected to Vcc is shown in Figure 1. On the other hand, in standalone mode we need to locate code externally. In this case we would disable the on board RISM by connecting jumper E1 to AB (This will connect EA# to ground). By doing this, the CCB at 2018H, and code at 2080H is found externally. The memory map for EA# connected to ground is shown in Figure 2.

Figure 1. Internal Execution Memory Map

Figure 2. External Execution Memory Map
Therefore, to run the 8XC196KD Target Board in standalone mode, you need to load code into external memory at locations 2000H and above while in standard mode. Then you must switch the EA# pin to low in order to force external execution (set jumper E1 to AB). The following examples should explain just how to do this. Table 1 shows a summary of running in standalone mode with different memory sizes.
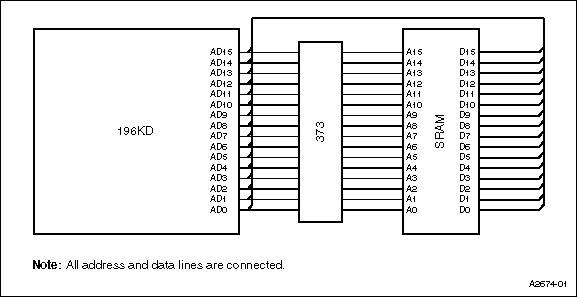
Figure 3. 196 Connections to External SRAM
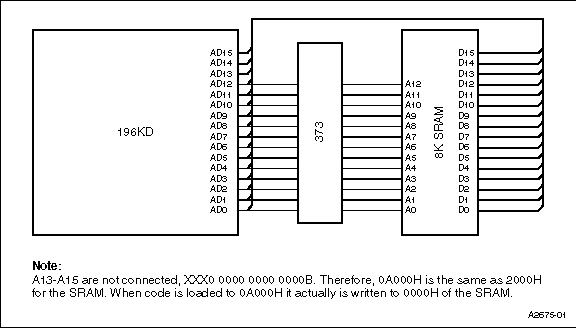
Figure 4. 196 Connections to External 8K SRAM
We now know that execution starts at 2080H, we must put our code there. This can be tricky if you are using SRAM. The RISM code for the Target board is located in locations 2080H to 9FFFH. We need to locate code in external memory at the same locations that code will be located at when the EA# pin is high (E1 not jumpered, internal memory being used). We can not load our code into 2080H and above because this is being used for the on board RISM. How do we locate code at 2018H, 2080H, and above in external memory? If we switch the EA# pin to force this region to external memory, we can no longer communicate with our PC because the RISM located in the internal memory (on board ROM) has been disabled. We must trick the memory into believing that the controller is addressing locations 2018H, 2080H, and above. This is simplified with the 8K SRAM. Because the end of the internal memory is at 9FFF and only 13 address lines are used with an 8K SRAM, A000H looks like 0000H to the external SRAM. The user should locate the Chip Configuration Byte at A018H and the beginning of the code at A080H. This locates the code at 0080H on the SRAM. Because only 13 address lines are used, 2080H looks like 0080H to the SRAM. When the 196 resets and the EA# pin is low (EA# jumpered to AB), it will attempt to fetch 2018H. This looks like 0018H to the SRAM because of the 13 address lines. Then code starts execution at 2080H (0080H on the SRAM).
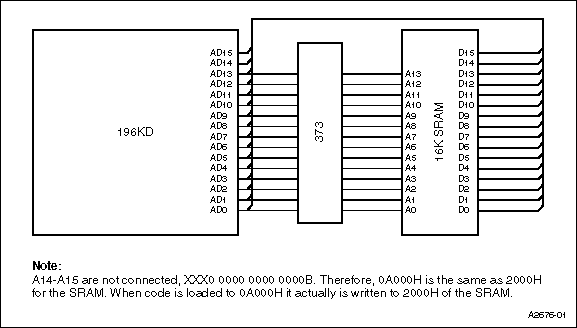
Figure 5. 196 Connections to 16K SRAM
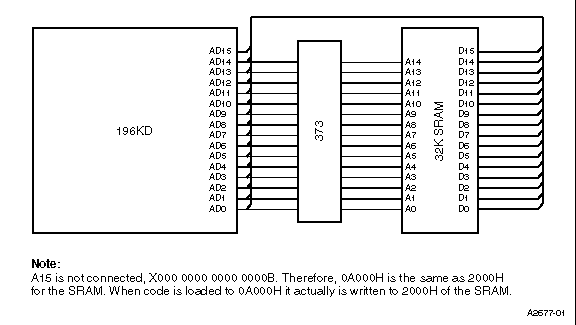
Figure 6. 196 Connections to 32K SRAM
Once you have successfully assembled your code you should run it through the object to hexadecimal converter program, called OH196.EXE, which is supplied with the project builder software. Make sure your EPROM software's buffer is empty by placing FFs in all unprogrammed locations. At this point load the converted hexadecimal program into your EPROM software's buffer. Upon viewing the buffer you should see your code, in hexadecimal, located in the exact memory locations you specified. For instance, you should see 20H at memory location 2019H and your code beginning at location 2080H. If you do not see these values at the specified locations you should review your work for errors. Program the EPROM with the code in the buffer and place the EPROM in the target board memory socket. Make sure that the jumpers correspond to those in table B-2 on page B-2 of the target board users manual. Additionally, be sure to place jumper E1, the EA# pin, in the AB position for external memory execution. Once you are confident that everything is complete supply the board with power and execution should begin.
Table 1. Standalone Mode and Different Memory Sizes
Device Program with Start code at
8K SRAM Target Board A080H
16K SRAM Target Board A080H
32K SRAM Target Board A080H
64K SRAM (not possible in standalone mode)
EPROM Programmer 2080H
Legal Stuff © 1997 Intel Corporation
